With that being said, I figured a good all around 'can do' cosplay is Henchman 21 from Venture Bros. In addition it's one of my favorite animated shows so it's a win-win. The other reason I chose this cosplay to start with is because I lack skills in the sewing department and having to make the outfit, pouches etc from scratch should prove to help bulster those skills. allowing me the opportunity to work towards much more detailed stuff in the future.
A lot of this information I got from other prop makers, this is merely meant to document my progress and process if at all different. The original concept for doing the mask this way comes from 2 Story Props, and their write up can be found at:
2StoryProps - Monarch Henchman
If you haven't already I would definitely follow these guys as they do some great work!
Alright so, onto the Build!

The most important thing here is knowing that anything animated, is not precise. If you watch any episode you'll see that the shape/size/orientation of the mask can change and vary quite drastically at times. So make something you find aesthetically pleasing.
I started with a reference photo, scaled it to my height in illustrator, and took rough measurements of the mask based on the photo. Once I had the dimensions I than drew it out roughly to size on some cardstock. I cut it out and tried it on. From there I needed to modify some things like the overall width ( I have a big head ) and distance between the eye holes.
Once all that was figured out I made one side of the template creased it in the middle and made the other side of the template (by tracing the outline). This could have been just as easily done in Illustrator or any other image manipulation program, I just chose to do it manually.

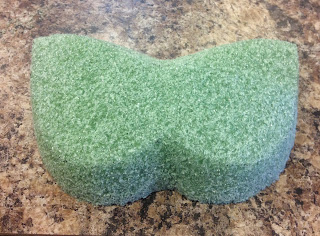
The foam I am using is hard green Styrofoam which comes in a variety of thickness and sizes.
This particular sheet I bought over-sized as I knew i could use it elsewhere.
It was 26.8 x 11.8 x 1.8 inches and I purchased it from my local Michael crafts store.
Michael's also sells soft green 'flower' foam. You do not want this as it crumbles and is somewhat difficult to work with.
I started by tracing my template on my foam block, Using a serrated bread knife I shaped the mask angle and here you can see it starting to take shape. However here's where I made a mistake, although not detrimental, I just ended up doing twice the amount of work. The correction would have been to cut the crown or the concave surface first before tracing out the masking and cutting that profile. I have a few picture of this process, but they aren't as important.
Taking small amounts off at a time can be annoying but you can't put the foam back on once you've cut too much off, or at least not easily, so keep that in mind!

Here is a photo of the finished rough carved mask with the exception of eyes holes. It's difficult to capture both angle, but you will be able to see it better in the following images.

So once I cut out the eye holes and retraced them onto the foam using a sharpie, I first drilled a large hole in the center of each eye. From there I used a rather course round rasp to gradually step the eyes down, working my way from the center outward. We're now ready for the hard part, Bondo!
I joke in saying that Bondo is the hard part, but it's my least favorite. Bondo is great and I have a decent amount of experience with it, but living in AZ working time unless you severely reduce the amount of hardener can be a bit of a challenge. The photo above was my first pass of bondo applied rather heavy and as a result a little uneven, but as you can see it's starting to take shape.
The tool in the photograph is a metal rasp that can easily be bent into different forms, I'll have to get the name of it later, but I used this to knock down any high spots while the Bondo was still curing, after it's dries your only real option from there is to sand it.
Stay tuned for future parts of this build!
I will be posting more as soon as I can get more accomplished, please ask question or let me know if this was helpful or what I could do to make it more so.
Cheers,
Kevin


No comments:
Post a Comment