Saturday, June 28, 2014

Venture Bros - Henchman 21 - Belt Buckle Update I

Here's some more progress on the Henchman 21 cosplay!

I'd like to make a resin cast of 21's Belt Buckle. I haven't figured out how I'm going to attach it, but I am hoping to make it at somewhat functional belt buckle. (and belt in general) Further elaborating on the resin cast, I plan to do this by creating a vaccu-formed shell of the buckle (what I'm carving), then using spray mold release I'll just pour the resin straight into that. Silicone is expensive and for a one time use seems like an extravagant waste. Much like the Mask, this process is very similar. 


It starts with a template, after scaling the size of my reference photos to my own height I took some basic measurements, from that I turned to my trusty 3d modeler - Rhinoceros - (I prefer it to Illustrator, as I'm not familiar with the newer versions of Illustrator (I have CS3) shortcuts, etc). I printed it out and viola.


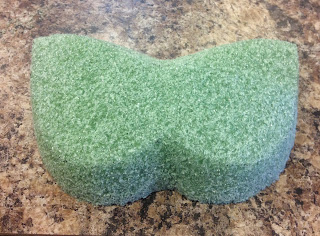
It get's traced onto another piece of hard green styrofoam, and cut out. Initially I rough cut it and then shaped it. The result of that can be seen in the next picture below. However I wasn't very happy with this because it was slightly oversized and I found trimming the sides down to be rather challenging. So I scrapped it, and started anew following the same method, but this time cutting it exactly too the lines before I worked on the middle 'gem' if you will. Again all the carving and shaping was done with a 13 inch serrated bread knife, I will have to get some photos up of the tools I use at a later date!


Last but not least, Bondo! Although the green styrofoam is hard enough to withstand vaccuforming pressure, the way it's composed could potentially cause small concave bubbles or imperfections in the plastic once vaccuformed. By bondo coating it, you are making a surface that, depending on the amount of time and effort you put into it is 100% smooth and none of those imperfections can occur.

I still have to do another coat to build up the bottom edges as well as some of the area that didn't come through. Finish sand and this weekend I may be able to try a few pulls on the vaccumformer. If not this will probably be address again sometime next week. I should mention that this will be the test before I do the mask to make sure that as an idea this will be sound!

As always feel free to ask me any questions, comment on what you like and what you don't like, I appreciate any and all feedback.

Cheers,
Kevin

Wednesday, June 25, 2014

Destiny - Hunter's Knife - Update I

Destiny is an upcoming online multiplayer action role-playing first-person shooter video game in a "mythic science fiction" open world setting. It's slated for release on September 9th 2014, and will be launched on both new gen systems as well as the PS3 and Xbox360.

With people playing the alpha and the beta soon on it's way, I can't help but really love this game! Aside from it looking absolutely beautiful, the weapon designs are super unique and look like they would be a lot of fun to make! Gun builds are cool, but I'm a fan of blades, so here's my take on the Hunter's Knife.  


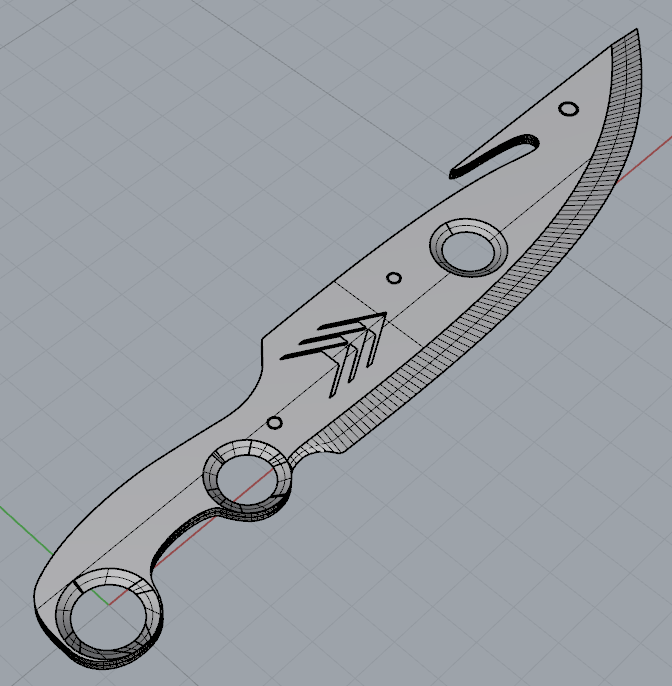
The original model was designed 3 dimensionally in Rhinoceros, based on a reference image and converted to a .stl for 3D printing. At my place of work we have access to several different 3D printers, I ran through a few Makerbot prints without success and a lot of heater extruder errors (it wouldn't be a makerbot if it didn't mess up at least once) haha.

Unable to get a good print on the Makerbot, I found this to be a great opportunity to learn and use the Dimensions printer. The machine we have is a Dimensions SST 1200es, although it has a lower print resolution compared to the Makerbot, it provides a consistent print almost every time.


Here's a quick mock-up photo of the pieces together. The discoloration in the middle section of the blade is due to the acid bath required to dissolve the support material, since the tolerance where slightly higher this solution was able to get into the middle and deteriorate some of the infill support materials, so it kinda looks like a bruise now. Weird I know, either way the pieces will be glued with an ABS specific glue or just regular super glue (Cyanoacrylate Glue). There are a few spots, which will need spot putty, and maybe a little bit of bondo work, but if I can avoid it, that would be ideal.

In the next update the piece should be together as one, and we may start working on molding this bad boy! As always if you found this interesting or have any questions let me know.

Cheers,
Kevin

Tuesday, June 24, 2014

Venture Bros - Henchman 21 - Mask Update I

So with the close of Phoenix ComiCon this year, and not having enough time to create a cosplay that I was happy with (only had about one week to work on anything if I was going to do it). I decided, hey, I should start working on my cosplay stuff now. That way it'll definitely be ready by next years ComiCon or potentially any other conventions I may be attending in the future.

With that being said, I figured a good all around 'can do' cosplay is Henchman 21 from Venture Bros. In addition it's one of my favorite animated shows so it's a win-win. The other reason I chose this cosplay to start with is because I lack skills in the sewing department and having to make the outfit, pouches etc from scratch should prove to help bulster those skills. allowing me the opportunity to work towards much more detailed stuff in the future.

A lot of this information I got from other prop makers, this is merely meant to document my progress and process if at all different. The original concept for doing the mask this way comes from 2 Story Props, and their write up can be found at:

2StoryProps - Monarch Henchman
If you haven't already I would definitely follow these guys as they do some great work! 

Alright so, onto the Build!


The most important thing here is knowing that anything animated, is not precise. If you watch any episode you'll see that the shape/size/orientation of the mask can change and vary quite drastically at times. So make something you find aesthetically pleasing.

I started with a reference photo, scaled it to my height in illustrator, and took rough measurements of the mask based on the photo. Once I had the dimensions I than drew it out roughly to size on some cardstock. I cut it out and tried it on. From there I needed to modify some things like the overall width ( I have a big head ) and distance between the eye holes.

Once all that was figured out I made one side of the template creased it in the middle and made the other side of the template (by tracing the outline). This could have been just as easily done in Illustrator or any other image manipulation program, I just chose to do it manually.


The foam I am using is hard green Styrofoam which comes in a variety of thickness and sizes.
This particular sheet I bought over-sized as I knew i could use it elsewhere.
It was 26.8 x 11.8 x 1.8 inches and I purchased it from my local Michael crafts store.
Michael's also sells soft green 'flower' foam. You do not want this as it crumbles and is somewhat difficult to work with.


I started by tracing my template on my foam block, Using a serrated bread knife I shaped the mask angle and here you can see it starting to take shape. However here's where I made a mistake, although not detrimental, I just ended up doing twice the amount of work. The correction would have been to cut the crown or the concave surface first before tracing out the masking and cutting that profile. I have a few picture of this process, but they aren't as important.

Taking small amounts off at a time can be annoying but you can't put the foam back on once you've cut too much off, or at least not easily, so keep that in mind!


Here is a photo of the finished rough carved mask with the exception of eyes holes. It's difficult to capture both angle, but you will be able to see it better in the following images. 


So once I cut out the eye holes and retraced them onto the foam using a sharpie, I first drilled a large hole in the center of each eye. From there I used a rather course round rasp to gradually step the eyes down, working my way from the center outward. We're now ready for the hard part, Bondo!


I joke in saying that Bondo is the hard part, but it's my least favorite. Bondo is great and I have a decent amount of experience with it, but living in AZ working time unless you severely reduce the amount of hardener can be a bit of a challenge. The photo above was my first pass of bondo applied rather heavy and as a result a little uneven, but as you can see it's starting to take shape.

The tool in the photograph is a metal rasp that can easily be bent into different forms, I'll have to get the name of it later, but I used this to knock down any high spots while the Bondo was still curing, after it's dries your only real option from there is to sand it.

Stay tuned for future parts of this build!
I will be posting more as soon as I can get more accomplished, please ask question or let me know if this was helpful or what I could do to make it more so.

Cheers,
Kevin

Sunday, June 22, 2014

Welcome

Welcome to my blog!
This is where I will be posting progress on future prop builds.
Currently I have several builds in the works and will update them asap.

Some future builds include:
Full Henchman 21 Cosplay
Destiny: Hunter Knife
Skyrim: Windhelm Hold Shield and more

Cheers
Kevin