Monday, September 5, 2016

Dredd 2012 - Helmet - Update I

At the end of May I was commissioned to make a helmet from the 2012 movie Dredd.

Dredd has a very cult following and as a result there is a lot of available information about the actual movie props and some of the people who were lucky enough to purchase the screen used piece recast them from time to time.

Pepakura and Mold Master Prep

This build will start out with the core structure of the helmet being made from a pepakura file. This isn't a typical process for me, but I was rather looking forward to it. The availability and access to a laser cutter helps significantly with scoring and cutting out the very intricate parts that make up said helmet. However the previous access I had to ASU's lasers had been taken away due to there need to rework ventilation and as a result taking the machines offline until the next semester of school started (far longer than I could wait). I asked a friend to help me as he had a tech shop membership, but long story short he was unable to get the vector files scaled correctly. Friends --- what are they good for haha.

A good portion of the available time for me to complete this project was wasted in the first month not being able to coordinate laser time and just nothing really going well. So the inevitable occurred and I started cutting the pieces out by hand. Thankfully there were only 41 parts, it took some time, but I got it assembled. I went with tape as a means to hold the parts together and although this worked there are far much better options out there so educate yourself about pepakura before embarking on an ambition project like this.

In a typical pepakura to molding fashion the process went like so (and will be mostly supplemented by pictures) establish a finished pep, fiberglass the inside and outside of the pep for stability, knock down any high spots with a rasp - super glue the newly exposed paper areas so they regain hardness, begin laying Bondo.


I bought a new gallon of Bondo for this project and I must have used at least half of it for the sculpting and detail work on the helmet. This was difficult and I spent a lot of time sanding, checking, rebonding, sanding again until it was at a point I was mostly happy with. Once the core bondoing was done we could move to paint. The paint in this case primer was used mostly as a check coat to ensure the surfaces looked good and everything was ready for molding. It's tough staring at something that green for so long you start missing the little imperfections and I find that this happens at every step along the way. A change in color is a good way to really pop unwanted characteristics if they are present in your piece.


Primer - sand - primer - sand - spot putty - sand you get the idea. When it was all ready, it was sanded to 400grit and I used Krylon Crystal Clear Gloss Acrylic to ensure that no cure inhibition would occur between the master and the platinum silicone. I thought about doing a matrix mold, but I was starting to fall behind on this project so I went the route of a Brush on with a fiberglass mother mold.


The next update will discuss the molding process of the helmet and the third the finishing and detail work.

As always if you have any questions or comments let me know and thanks for checking out my blog.

Cheers,
Kevin

Sunday, June 5, 2016

TF2 - Group Cosplay - Melee Weapon Update I

So although I had plans for cosplay this year at PCC16, among other set backs, time just ran out.

Here's a quick update of where I currently stand with my TF2 group cosplay.

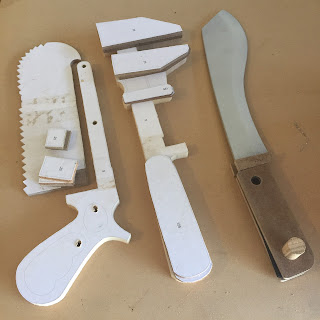
Probably a year or so ago I drew up cad files for laser cutting the basic structure of the bonesaw and wrench, I ended up doing it right before I graduated college but lost the parts and kinda forgot about the files. Two months ago, I wanted to revive this thought and started working on the sniper's Kukri.

Still not being able to find the old pieces I laser cut, I re did the templates by hand roughly cut them on my bandsaw and sanded to the respective lines of my template. I do all my templates in Rhinoceros 3D so that if I choose to, I can also create 3 dimensional parts very easily from my 2D lines. This program is not free, but you can get a free 60 day trial before you buy.


 Original Engineer Wrench and Medic Bonesaw


Sniper Kukri - very basic linework


 Spy - Knife (still in the works)


The screw portion of the wrench I had a buddy 3D print for me I'll show you guys in the next update.

When I start to work on the guns (likely after the melee weapons are finished) I will post up a secondary update thread just for those.

As always if you have any questions, comments, concerns please let me know and I will do my best to get back to you asap.

Cheers,
Kevin

Monday, May 30, 2016

Trigun - Nicholas D Wolfwood's Cross (Punisher)

Hey Guys,

Been a while since I've really updated any of this. A lot of things have happened since my last real post and as a result not a lot has gotten done in the prop department. Back in July of 2015 I moved to California for a job right out of college. It paid well, was mildly fun, but I was very disposable.

3 months went by and then it was time to move back to AZ. California was cool, but it wasn't my cup of tea and although I enjoyed the job I really disliked the people and the atmosphere. The beaches were beautiful and the coastal weather was a nice change of pace.

I was jobless for a month of two after moving back and then found a job with a couple fellow grads at a 3D printing startup company. If you don't know the nature of startups it's a lot of work. Just juggling my etsy prop orders was becoming a challenge.

Thankfully after 5 months things have started to calm down. Just in time for Phoenix Comic Con!
Well I had plans to do a group cosplay of TF2 characters those fell through, the person I was originally going with had to bail due to family reasons it happens, but it stinks. A buddy at work who I didn't know was into cosplay told me he was and that he needed a prop - so a long way of getting around to the actual build at hand.

His Brother is doing Vash the Stampede so he's doing Nicholas D. Wolfwood (As you could have gathered from the title of this blog post).

I had a grand scheme for this project but with a week to work on it I stumbled a little through it.

tldr - finally back and working on prop stuff

BUILD:

The original goal was to laser cut the core support for the cross.
I was able to get the wing portion of the cross cut but there wasn't appropriately sized material when I had access to the laser to cut the bigger portions. So I did it traditionally

I'm not going to go into great detail here and it won't be a picture heavy build but it should give a good general idea of the process and what I did here.


The main dimensions of the cross are 67inchs tall (5ft 7in) 48 in wide, the cross wings are 18 in wide and 12in tall, the whole cross is 6in deep, the top is 15.25 tall. I faced the core structure with another wall of 1/4 in MDF. Due to the shear size of this piece I had to use a couple of sheets of material you can see how I cut the top surface out clamping it in halves after everything had been sanded smooth.

In the middle of gluing up the second panel of the first side I had a mental questioning/change of heart. My buddy was going to be lugging this around the convention floor for a couple hours and it weighed roughly 35lbs, which was just to ridiculous. Why I didn't think about this to begin with is astounding to me but either way. I had to switch mid stream to everyone's favorite lightweight prop building material, Pink Insulation foam board.

Similar construction methods were utilized in the making of this version, the difference is I busted this out in 2 days. I utilized a table saw to cut most of the dimensional pieces and an olfa blade to cut the rest. If you're planning to cut foam make sure you have a really sharp razor knife and plenty of new blades as this stuff chunks out really easily if you're not careful, and it's not easy to fix it. The glue I used here is Glidden Gripper White Primer and although that may seem weird it works well for foam to foam contact be careful not to glue it to the plastic sheathing that covers the foam otherwise it will just pull right up.


The last picture of the build (pictured above) is to show that I went from extremely heavy to extremely light, therefore I added some weight to the bottom otherwise it would just be blown away super easily by the wind. So I added a foot to the bottom - maybe 2-5 lbs. now it acts more like a rock-em-sock-em robot where it's bottom heavy and not prone to tipping over. This will help as well when my buddy want to set it down during the con and he doesn't have to worry about it falling etc.

I gave him the cross blank and he was in charge of wrapping it and doing the strapping/clips. Below is a picture he sent me this morning and damn is this thing gonna kill it, I cannot wait to walk the convention floor with him and his buddy. Comic Con see you in  3/4 days.


I'll plan to do a photoshoot sometime after comic con with both of them so I will make a new thread with finished pictures from that shoot. 

Thanks as always and if you have any questions feel free to hit me up.
Stay tuned for more updates on current projects and a ton of new stuff happening soon.

Cheers,
Kevin 


Monday, May 23, 2016

Prop Projects Mostly Completed

Prop Progression Completed Projects

Adventure Time Finn's Sword (don't have a finished picture on hand this is the master)


Destiny Hunter Knife (original iteration followed by low production units)


Dragon Priest  Masks (original 3 colors) and 2 variants I really liked.


N7 Eagle (casted as 6 parts) / Arc Pistol Milled on a CNC


Currently working on:
Destiny Titan Hammer
Fallout 4 Institute Pistol/Rifle
Nicholas D. Wolfwood's Punisher (cross from Trigun)
TF2 Group cosplay (melee and primary weapons for scout, engineer, sniper, medic)
Still haven't finished everything that hasn't been updated in the previous threads ha.

Things I want to get around to finishing.
Marceline's Bass Axe
Skyrim Hold Shield
Costume for TF2 stuff not just props

But always looking for more things to make.